Guide
How to Save an Overwatered Plant
Six steps in order. The first one is to stop, and the hardest part is not watering it again out of sympathy.
By Scooter M. - Enthusiast. Reads the manuals, compiles the specs, does the math. | Published
Disclosure
We earn a commission if you buy through our links. It does not change what we recommend or what you pay. Full disclosure.
The short answer
- Stop watering, and empty the saucer.
- Move it out of direct sun and somewhere with air movement.
- Unpot it and look at the roots. Firm and white is fine; mushy and brown is not.
- Trim rotted roots back to firm white tissue with clean scissors.
- Repot into fresh, open mix in a clean pot with working drainage.
- Water once to settle it, then leave it alone until the mix dries down.
Before anything: confirm the diagnosis
Wilting appears under both overwatering and underwatering in extension guidance, so confirm before you act. Wet soil two inches down, mushy leaf tissue, a heavy pot, fungus gnats or a sour smell all point to too much water. The full diagnostic takes ten seconds. If it is actually dry, everything below is the wrong treatment.
Step 1: Stop, and empty the saucer
The instinct when a plant looks distressed is to do something, and here doing nothing is the intervention. Empty any standing water immediately. Virginia Cooperative Extension is explicit that a container should not stand in water for more than 60 minutes, and a plant sitting in a full saucer for days is living in exactly the wet, poorly drained conditions that root-rot organisms need.
If the pot has no drainage hole, that is the root cause and it has to change at step 5. There is no watering technique that makes an undrained pot safe.
Step 2: Move it, and get air moving
Somewhere bright but out of direct sun, with some air movement. Direct sun on a plant with compromised roots increases demand it cannot meet, and you will get scorch on top of the rot. Air movement across the surface speeds drying and discourages fungus gnats.
Do not put it somewhere warm to dry faster. Warmth accelerates the pathogens as much as the drying.
Step 3: Unpot and look
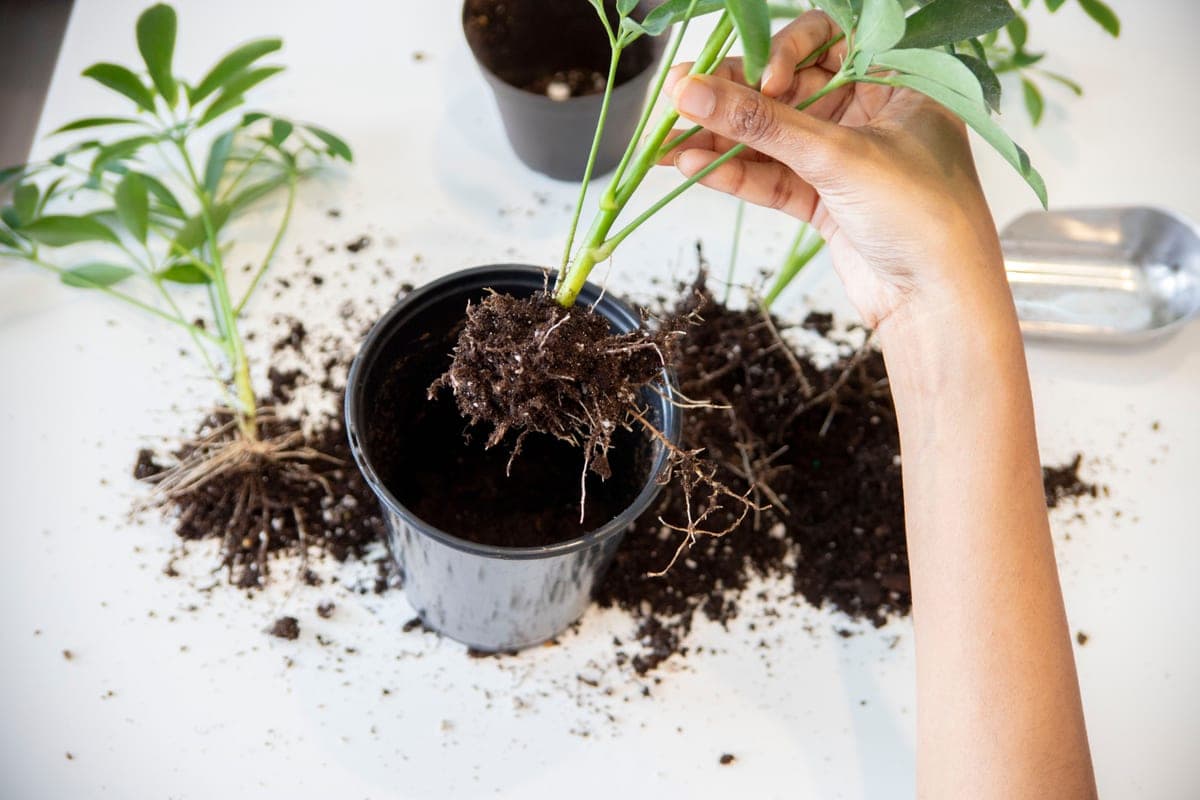
This is the step people skip and it is the one that decides everything. Tip the plant out, support the root ball, and look. NC State Extension gives the comparison plainly: healthy roots are firm, white and carry lots of thin feeder roots. Rotted roots are mushy and brown or reddish.
Smell it too. Healthy potting mix smells earthy. Rot smells sour or sulfurous, and that smell is a reliable confirmation.
If the roots are all firm and white and the mix is simply saturated, you have caught it early. Skip to step 5, repot into fresh mix, and you are done.
Step 4: Trim what is gone
Clean scissors or snips. Cut every mushy, brown or hollow root back to firm white tissue. Be decisive - leaving rotted material in the pot leaves the pathogens there too. Wash the tools between plants if you are doing several.
Then reduce the top to match. A plant that has lost half its roots cannot support all its leaves, and leaving full foliage on a halved root system guarantees continued wilting. Remove the worst-affected leaves and, on a trailing or bushy plant, cut it back proportionally. It will look drastic and it is the right call.
Step 5: Repot properly
- Fresh mix, not the old one. The old mix is saturated and carries the pathogen load. Use a light, open potting mix - the NC State container chapter describes why perlite and bark are there, which is to keep the structure open and draining.
- A clean pot with a working drainage hole. Wash the old pot or use another. Check the hole is not blocked - NC State Extension specifically mentions checking that drainage holes have not become clogged.
- Size down if you removed a lot of root. A small root system in a large volume of mix stays wet for far too long, which recreates the problem.
- No gravel layer in the bottom. A coarse layer under a fine mix creates a perched water table at the interface and makes the saturated zone worse, not better.
Step 6: Water once, then leave it
Water thoroughly enough to settle the mix around the roots and let it drain fully. Then do not water again until the mix has genuinely dried down in the upper root zone. This will feel wrong for two weeks. Do it anyway.
Do not fertilize. A damaged root system cannot use it, and the salts raise the concentration in the mix at exactly the wrong moment - which also means any meter reading in that pot will read wetter than the pot is. Wait for new growth before feeding anything.
Preventing the next one
Once the plant is stable, and only then: the durable fix for an overwaterer is measurement, not willpower. Watering on a schedule is the underlying error, and the RHS says so directly - avoid a routine such as watering once a week, and instead water less often but more thoroughly, letting the surface dry first.
A moisture meter makes that check quick enough that you actually do it, which is why it is the honest recommendation here rather than a planter. A reservoir planter is the right buy for someone who forgets; for an overwaterer it can make things worse.
What we would buy for this
The gear that fits this problem
Chosen from the same registry as our roundups, on published specifications and the computed refill interval.
XLUX T10 Soil Moisture Meter
Anyone who has killed a plant by watering on a schedule
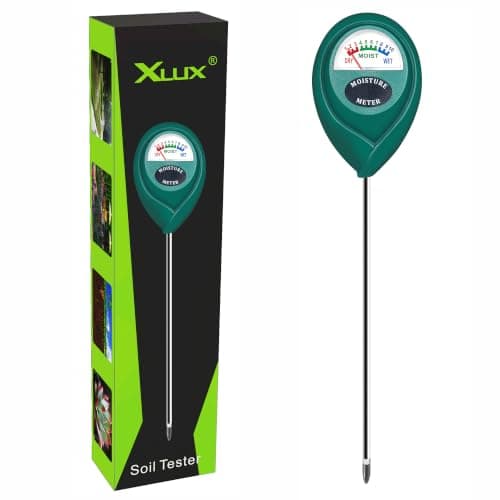
The default answer in this category, and it earns it: a single probe, no battery, a 1-to-10 dial with dry, moist and wet bands, and a probe long enough to reach the root zone of a real pot rather than the top inch.
#ad Price as of October 18, 2026, from Amazon. Prices change. How we make money.
Published specification
- Probe length
- About 7 in (17.5 cm)
- Power
- None required, since the probe generates its own signal in moist soil
- Scale
- 1 to 10, banded DRY, MOIST and WET
- Probe design
- Single probe, to limit root damage
- Weight
- About 2.5 oz (70 g)
- Probe length: XLUX published specification, via retail listing
- Power: XLUX published description
- Scale: XLUX published description
- Probe design: XLUX published description
- Weight: XLUX published specification, via retail listing
What is good about it
- No batteries means it works the day you dig it out of a drawer eighteen months later
- A 7-inch probe reaches the middle of a 6-inch pot, which is where the answer actually is
- The banded dial answers the only question you have, water or do not, without pretending to a percentage it cannot deliver
- Cheap enough to buy two and leave one in the room with the plants
What is not
- It reads conductivity, not water content, so heavily fertilized soil reads wetter than it is
- The 1-to-10 scale is relative, not calibrated to any standard, so two meters can disagree
- Single probe means one reading per insertion, and pots are not uniform
Skip this one if
Skip it if you have three plants and a finger. Virginia Tech's own guidance is to push a finger 1 to 3 inches into the mix and check, and for small pots that is genuinely as good. Buy a meter when the pots are deep enough that your finger cannot reach the root zone.
How it scored
- Published specification
- 8.5
- Probe reach
- 9.0
- Readability
- 9.0
- Value for money
- 10.0
- Measurement honesty
- 6.5
- Overall
- 8.7 / 10
Our editorial score, from published specifications and computed intervals. Not a test result. Specification source: XLUX T10 retail listing.
Gardener's Supply Adjustable Self-Watering Insert
Turning a planter you already own and like into a self-watering one
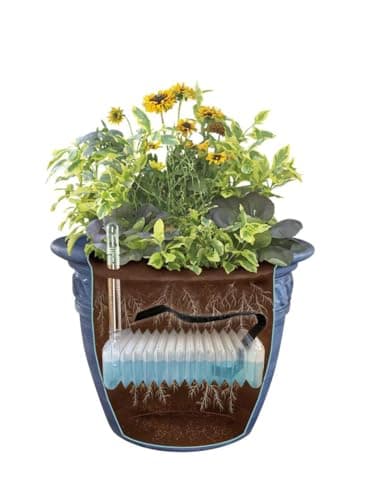
The one conversion kit here that publishes its reservoir capacity at both ends of its adjustment range, so you can work out what you are getting before you buy. Compressed it is a week. Extended it is a month and a half.
#ad Price as of October 18, 2026, from Amazon. Prices change. How we make money.
Published specification
- Reservoir capacity, compressed
- 1.5 quarts (about 1.4 liters)
- Reservoir capacity, extended
- 5 quarts (about 4.7 liters)
- Fill tube height
- Adjustable 11.5 to 22 in
- Container shapes
- Round, square and rectangular
- Watering method
- Wicking from a below-soil reservoir, filled through a tube
- Reservoir capacity, compressed: Gardener's Supply published specification, via retail listing
- Reservoir capacity, extended: Gardener's Supply published specification, via retail listing
- Fill tube height: Gardener's Supply published specification, via retail listing
- Container shapes: Gardener's Supply published description
- Watering method: Gardener's Supply published description
Refill interval - computed, not tested
About 6 days compressed, up to about 6 weeks fully extended
Compressed: 1,420 ml divided by 800 ml per thorough watering of an 8-inch pot is 1.8 waterings, so 6 to 12 days at once or twice a week. Extended: 4,732 ml divided by 800 ml is 5.9 waterings, so 21 to 42 days.
Assumes: 8-inch tropical root ball, indoors. Light, temperature, humidity, soil mix and season all change how fast a pot dries, so treat this as a planning range and not a guarantee.
What is good about it
- Publishes capacity at both ends of the adjustment, so the range is checkable rather than a marketing claim
- Lets you keep a planter you already like instead of buying a new one for its plumbing
- The tall fill tube means you top up without disturbing the plant
What is not
- Useful capacity depends entirely on how deep your existing pot is, and a shallow pot gets the 1.5-quart end of the range
- Costs a meaningful fraction of what a new self-watering planter costs
Skip this one if
Skip it if your pots are shallow. Compressed to fit an 8-inch-deep container it holds a quart and a half, which for a medium houseplant is about a week, barely better than remembering.
How it scored
- Published capacity
- 10.0
- Computed interval
- 8.0
- Flexibility
- 9.5
- Value for money
- 7.5
- Ease of setup
- 7.5
- Overall
- 8.6 / 10
Our editorial score, from published specifications and computed intervals. Not a test result. Specification source: Gardener's Supply adjustable insert retail listing.
Questions people actually ask
- Can you fix an overwatered plant?
Often, if you catch it before the whole root system is gone. Stop watering, unpot it, trim rotted roots back to firm white tissue, repot into fresh open mix in a clean draining pot, and then leave it alone until the mix dries down.
- How long does it take an overwatered plant to recover?
Days to weeks. The first sign is that existing leaves stop declining; new growth comes much later. Do not judge it after 48 hours and water again out of sympathy.
- Should I repot an overwatered plant immediately?
If the roots are rotting, yes - the old mix is saturated and carries the pathogen load. If the roots are all firm and white and the mix is merely wet, you can often just let it dry down without disturbing it.
- Should I use hydrogen peroxide on an overwatered plant?
We would not recommend it as a treatment. The published guidance for root rot is mechanical and cultural: remove the rotted tissue, repot into fresh open mix, fix the drainage, and correct the watering. That addresses the conditions the organisms need rather than trying to sterilize a pot they already occupy.
- Should I cut back the leaves as well as the roots?
Yes, proportionally. A plant that has lost half its roots cannot support all its leaves, and leaving full foliage on a halved root system means continued wilting and more stress.
Sources
Sources
- Daughtry, Watering but Not Overwatering Houseplants, NC State Extension (2022)
- Criscione and Holliday-Goulart, Properly Watering Container Houseplants, Virginia Cooperative Extension SPES-804 (2026)
- Plants Grown in Containers, NC State Extension Gardener Handbook chapter 18
- Royal Horticultural Society, Watering plants wisely